Windows Share Player
For Android

By Maildover LLC
![]()
What is Windows Share Player?
It’s a fun app that allows you to browse your Windows shared directories, view text files (text, html) and play media files (audio, video).
Windows shares, also called SAMBA or SMB shares are directories and files on Windows PC accessible from remote computer, via either wireless or wired network. Some non-Windows SAMBA file servers provide SMB access as well, such as NAS (Network Attached Storage) file servers. SMB sharing is available also on Mac and Linux computers.
In addition to browsing SMB shares, this app allows you to browse the phone's SD card content, view/edit text files or play media files, in the same manner that it does for SMB shared files.
Who is it for?
This app is for any Android user, since virtually any Android user has some access to Windows, Mac, Linux or NAS computer that can be set with SMB shares.
How does it work?
If you just want to browse, view and/or play media files on your phone's SD card, simply start the app and click "browse local" button. Otherwise follow these steps.
Step 1 – Setup SMB Shares and appropriate account - In order to access Windows shared files using this app, you need an active account on the Windows or NAS computer that allows for remote access. Normally, any account that is member of the Administrators group will do. Next thing you’ll need are some SMB shares. These are very easy to setup, and there is plenty of available documentation on the Internet on how to do that. Basically you right-click on a directory (folder) you want to share, select properties->Sharing->Share this folder (Windows XP).
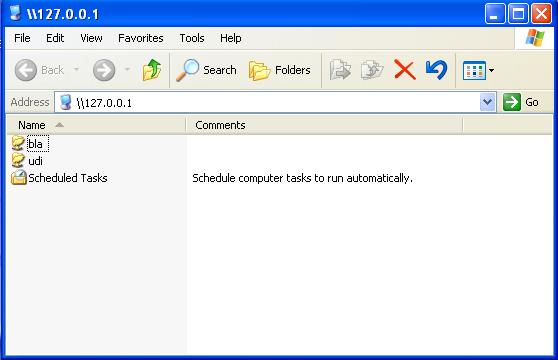
Once you have setup your shares, you can verify by doing the following:
· Click the Windows “start” button (bottom left on Windows XP)
· Select “run”
· Type \\127.0.0.1 and hit enter
· The list of directories you see are the ones you may have remote access to.
Step 2 – Find your sharing IP: If you are using Windows, there is one more step you can perform that will help you setup the access from your Android phone -
· Click the Windows “start” button (bottom left on Windows XP)
· Select “run”
· Type “cmd” and hit enter
· Type “ipconfig” and hit enter
Some textual information will be printed, take a note of the IP address that shows up at the bottom of this printout. Depends on your connectivity, either “local area network” or “wireless network” will show up with some IP address, for example :
Ethernet adapter Local Area Connection:
Media State . . . . . . . . . . . : Media disconnected
Ethernet adapter Wireless Network Connection:
Connection-specific DNS Suffix . :
IP Address. . . . . . . . . . . . : 192.168.1.2
Subnet Mask . . . . . . . . . . . : 255.255.255.0
Default Gateway . . . . . . . . . : 192.168.1.1
In this example, my PC is connected via wireless router, using IP Address 192.168.1.2
Step 3 – Verify remote connectivity: Once your connectivity and shares seem to work locally as you intended, you can verify the remote access by connecting to the shares from a different computer which resides on the same home network (providing that one is available). To do that, repeat Step 1 above but this time from the other computer, using the IP Address you’ve got in Step 2 (in my case, 192.168.1.2). You will be prompted to enter username and password, enter the username and password for the account you have setup for SMB sharing. If access is granted, you should see the same shares as in Step 1.
Step 4 – Verify WIFI on your phone: In order to access these shares from the app, you need WIFI connectivity between your Android phone to your home network, where your shared directories reside. A good way to verify your WIFI connectivity is to open the Internet browser on your phone and try to browse some web sites, while your WIFI is on and the mobile network is off.
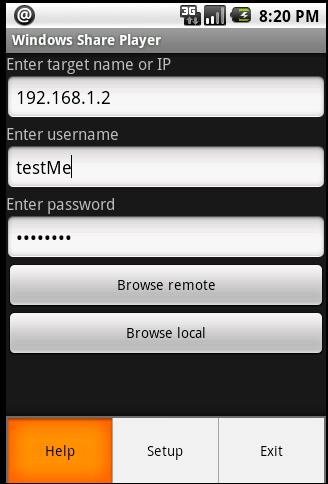
Step 5 – Login from the app: Once the WIFI is in working order, start the app. You need to enter the following information:
Computer name or IP:
That is the name or the IP Address of the Windows (or other computer) where your SMB shares reside. In my example above, it is 192.168.1.2 (make sure you enter these numbers exactly as you have it printed out without spaces etc.)
User name:
That’s the username for the account in your Windows (or other SMB share) computer hosting the shared directories and files.
Password:
That’s the password for the user entered above. Again, make sure both user name and password are entered correctly without spaces. Both username and password are case sensitive.
Note that you need to enter computer name or IP, username and password only the first time you use the app – when you exit the app it will save these entries, so next time you start the app they will show up.
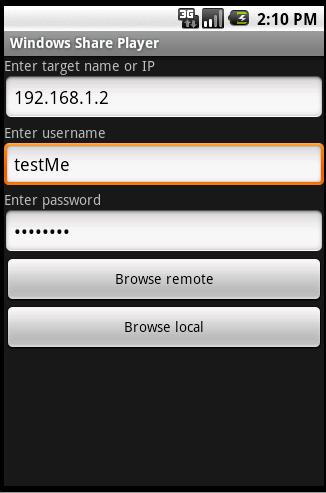
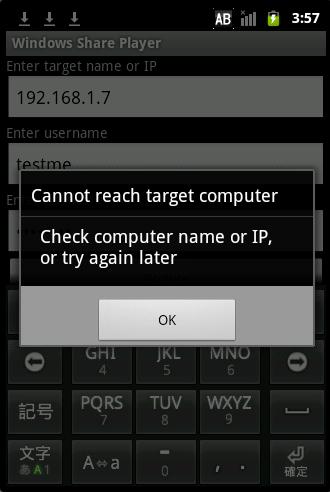
Click “Browse” button. If connectivity is fine and access is granted, you should see the same shares as in Step 1. If either connectivity is broken or username/password are incorrect, you will get an appropriate message suggesting to either check the connectivity or re-enter username/password.
Step 6 – Browse the shares: At this point, once login is successful, you’ll see the same list of shared directories as in Step 1. The top line in this list is the computer name or IP. Note that each item in the list has icon to the left, indicating if its a folder (directory) or a file, and which type of file (media file, text etc). Files with "Android" icon (really this app's icon...) meaning this file probably cannot be viewd/played on this phone, you can always click it and try ...
You can click on any of the shared directories in this list. Clicking on a shared directory will drill down to the list of shared files and directories that belong (under) this shared directory. Clicking again on one of these sub-directories, will show up the sub-sub-directories and files, etc . Note that the top line always shows the full path to your current directory. If the list is longer than a full screen, you may scroll up and down the list. Clicking the “back” button will show the list of files and directories one step before the current one.
Same view will be presented when you click "browse local", showing the content of the SD card:

Note also that directories (i.e. folders) are always marked with “/” at the left end of the directory name, and do not have [file size] associated with them. Any item in the list which is not a directory, (i.e. a file), will have [file size] showing up to the right of the item. File size is either in bytes [], kilobytes [KB], megabytes [MB] or gigabytes [GB].
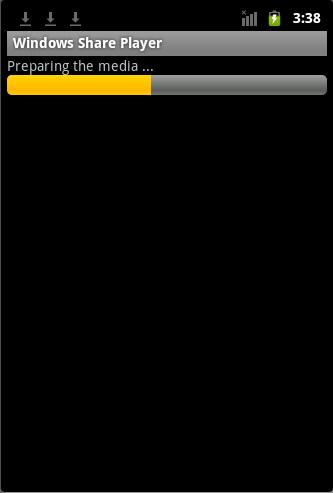
Step 7 – Viewing a text file or playing media file: Once you see a file you want to view or play, simply click on it. A progress bar will show up, indicating the download progress. Note that the app works by downloading the media file first to a temporary file in the phone’s SD card, then playing it. Once download completed, the app will launch the appropriate Android viewer or media player for the selected file.
Note that only file types supported by the app are viewable or playable. These are text files (txt, html and xml) or media files (jpg, png, gif, mp3, mp4 and wav). If you click on a non-viewable or playable file, nothing will happen.
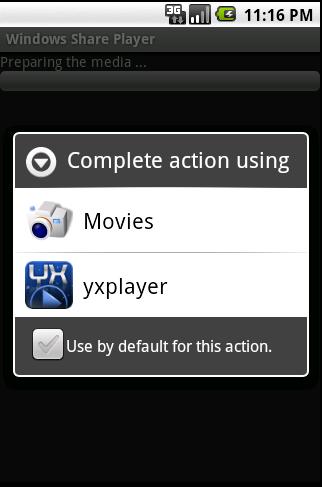
At this point, if you have only the default Android file viewer/player installed on your phone, the appropriate file viewer/palyer will be launched to view/play the selected file. If you have more than one file viewer/player installed, you will see a list of viewers/palyers to choose from:
Step 8 – While viewing or playing: You may view, edit, pause, rewind, replay etc, while the file is played or viewed. Once the playback is finished, the current player or viewer will quit automatically, and the latest list of shared files and/or directories will show up again – you can continue as before, browse the directories, view/play files etc.

Step 9 – Exiting the app: You may exit the app at any point, simply click the “back” button few times, until you get the Android home screen. Note that the information you entered during the login, i.e. the computer name or IP, username and password will be saved, so next time you start the app they will show up, so that you don’t need to re-enter them. You can always modify them though, when you exit the app it will save the new entries.
Settings
The following menu options are available when hitting the menu button:
Clicking the help button will open a web browser to this page, and Exit will terminate the app. When clicking the Setup button, the following option will show -
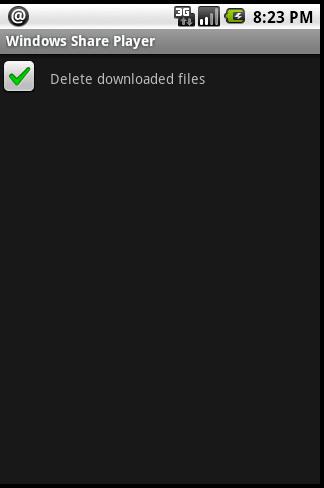
This option controls weather downloaded SMB files are saved on your SD card after the app quites, or cleared when the app quites. By default the app will clear all saved files when it quites, but you can reverse this by un-checking the box above. Note that all downloaded SMB files are saved under /sdcard/winshare, when the box is un-checked.
Perquisites and comments
Supported Android OS:
1.6 and above
Connectivity required:
WIFI (does not require Internet access or mobile network)
Limitations:
- SD card space: This app need to completely download the text or media file you selected to the SD card before viewing or playing it. You need to have enough free space on the SD card to completely download the file.
- SMB share missing artist/album etc: Shared mp3 files do not show artists, album and duration when playing. This is being researched and likely be fixed soon
- WIFI download speed: Note that when after clicking on SMB file in order to play it, if the file is large, it may take long time for the download- depends on the file size and on your WIFI signal.
Next …
We plan to improve the app in different areas. Please get in touch and let us know your thoughts, ideas, comments, questions etc.
Maildover LLC
maildover@gmail.com
![]()